Tackle Tracking Water Usage
Kyle Niewiada on October 13, 2023
15 Minute Read | Large project
Data driven decision making is how I prefer to approach my smart home. A few years ago, I started the journey of tracking my electric and gas utilities. Water tracking eluded me. With our meager household consumption, it never made sense to tackle tracking water usage. But our family grew. I restored parts of our ancient irrigation system. Then we added garden beds! Suddenly we using more water.
Now I had a reason to track it.
Why Track Consumption?
While on a walk last week, I spotted a neighbor with a busted sprinkler head. Water was gushing into the street and washing out our their new grass.
How would you know if your sprinkler head breaks off?
What if the toilet keeps running in the middle of the night and no one hears it?
I want to track these things. With a little bit of help from some automations, I can get pretty close to detecting similar anomalies and overage.
Options
Ok. How can I track my water usage?
The first thing I did was spend considerable time researching how my township tracks my water consumption. At my residence, they have a water meter installed in my basement with a wireless module reading the meter’s pulse output signals. Since this hardware is owned by the township, I’m not allowed to touch or modify it in any way. But I could simply listen to it.
I thought this would be an easy win. Simply hook up a radio receiver and listen to the signals the device broadcasts. But once I started capturing the signals, I soon realized that they were encrypted. Continuing down this path would not have been an easy effort.
Next, I considered buying a consumer-ready product for tracking. There are some top contenders like the Moen Flo or Flume. Both track water usage, and some have extra features like a built-in water shutoff. But nearly all of them require the cloud and cost a small fortune.
My goal was to avoid vendor lock-in and cloud-only support. I despise devices that require the cloud ❌.
After spending way too long researching different routes and getting nowhere, I reluctantly pivoted to roll my own local setup for tracking consumption.
Rolling My Own
Here’s the overview
- Home Assistant will live at the center and collect all data
- I will use water meters that support sending pulse output signals after each gallon is consumed
- The first water meter will track our total home consumption
- It will use a custom ESPHome device for counting the water meter pulse output
- The second water meter will track our irrigation consumption
- It will connect to OpenSprinkler and connect with Home Assistant to calculate consumption
I will track our entire household consumption by installing our own sub-meter immediately after the township’s water meter. A custom ESPHome device will be deployed to track the pulse outputs from the sub-meter. The consumption data will be stored in Home Assistant.
I will track our irrigation water consumption with a second sub-meter. In some homes with a connected sewer system, they sometimes run a second water line metered exclusively for irrigation. This is because local governments often exclude sewer fees for irrigation consumption.
However, we don’t have a separate water line for irrigation. Our house uses a septic tank for waste. This means that we don’t pay sewer costs for any water that our household consumes. The township has no interest in running out an additional metered line for irrigation as there is no cost difference in billing. Instead, they have us consume our irrigation water from our main water line.
I guess the irrigation meter is more a sub-sub-meter since it’s in series with the other sub-meter (more on how that impacts my calculations later!).
What I Used
Main Water Meter
- DAE MJ-75 (potable water meter with pulse output)
- ESP32 dev board
- PCB screw terminal block for easy assembly
- Solderless prototype breadboard
- Extra wire laying around
- USB cable
- USB wall plug
Irrigation Water Meter
- DAE MJ-75 (potable water meter with pulse output)
- OpenSprinkler controller
- Jameco GPU572401500WA00 24 Volt @ 1500mA Transformer (to run multiple low-flow zones in parallel)
Setup
For tracking water consumption, I am using a DAE MJ-75 water meters for each leg. They’re NSF61 certified, safe for cold potable water, and already have a built-in reed sensor with pulse outputs for every gallon consumed.
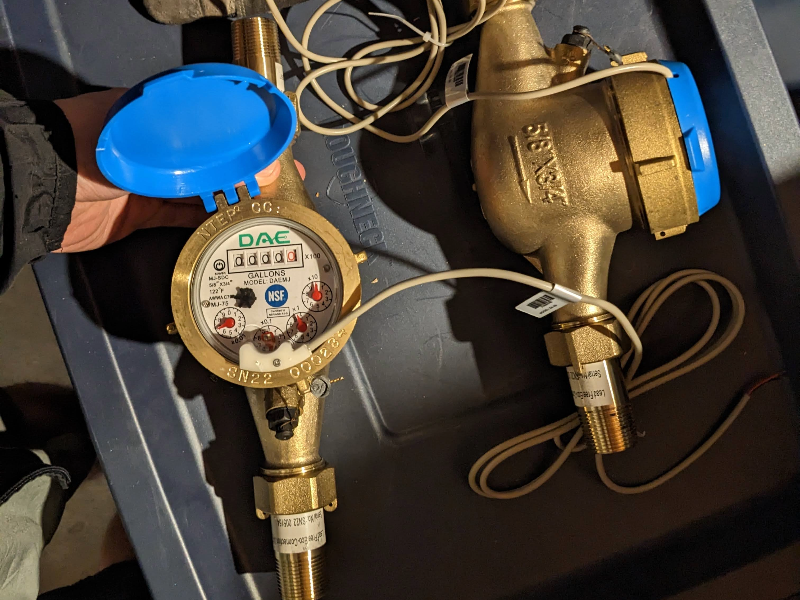 DAE MJ-75 water meters ready to install
Main Meter with ESPHome
I’m tracking my overall consumption from the main sub-meter by running the meter wires into an ESP32 dev board. I’m wiring the meter reed switch directly into the GPIO32 and GROUND.
I chose an ESP32 dev board because it’s cheap, works with ESPHome, and has built-in pull-up resistors. These pull-up resistors allow me to prevent the incoming reed switch signal from floating around while open. I could have created a pull-up resistor with actual resistors, but this was easier.
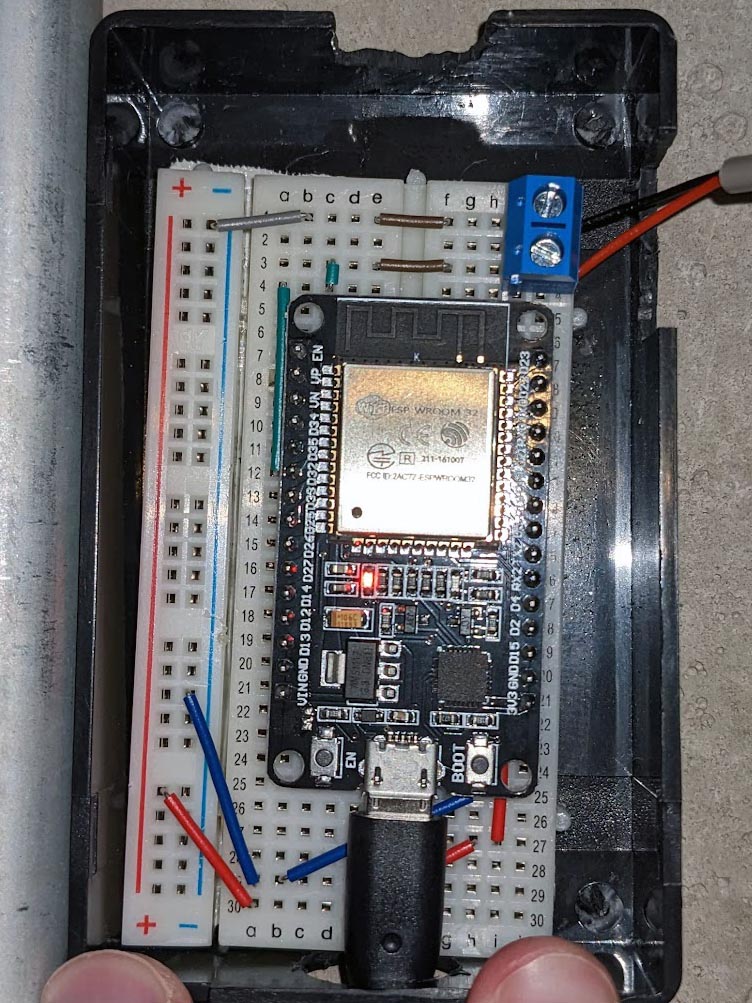 ESP32 dev board connected to a water meter with
 GPIO32 and GROUND. Extra wiring present on the 3.3V and GROUND from earlier testing.
Here is my ESPHome Water Meter Configuration:
# Basic Config
# esp_32
# Water Meter
# Written on v2023.9.3

# Alleged Reed Switch data from manufacturer:
#   Pulse Output: 1 gallon per pulse
#   Qmax: 20 GPM (gallon per min.)
#   Width of the pulse: 3 sec
#   Width of the pulse with continuous output: 0.75 sec
#   The angle with continuous output: 90 degree

substitutions:
  plugtag: esp-32
  devicename: Main Water Meter
  deviceid: main_water_meter

esphome:
  name: ${plugtag}
  comment: ${devicename}
  platform: ESP32
  board: nodemcu-32s

wifi:
  ssid: !secret wifi_ssid
  password: !secret wifi_password

  # Enable fallback hotspot (captive portal) in case wifi connection fails
  ap:
    ssid: "${plugtag} Hotspot"
    password: !secret ap_hotspot_password

# Enable captive portal if wifi ever changes
captive_portal:

# Enable Home Assistant API
api:
  encryption:
    key: !secret encryption_pre_shared_key

ota:
  password: !secret ota_password

# Enable logging
logger:

# Expose virtual button in Home Assistant to restart device
button:
  - platform: restart
    name: "${devicename} Restart"

# Sensors that the ESPhome unit is capable of reporting
sensor:
  - platform: pulse_meter
    pin:
      number: GPIO32
      inverted: true
      mode:
        input: true
        pullup: true
    internal_filter_mode: PULSE
    internal_filter: 200ms
    unit_of_measurement: 'gal/min'
    accuracy_decimals: 1
    name: "${devicename} Flow"
    icon: 'mdi:water'
    total:
      id: water_total
      internal: true
      icon: 'mdi:water'
      device_class: 'water'
      unit_of_measurement: 'gal'
      # This automation will be triggered when a new value that has passed through all filters is published.
      # In Lambdas you can get the value from the trigger with x.
      on_value:
        then:
          - sensor.template.publish:
              id: water_consumption
              state: !lambda "return x;"

  # Templated sensor to provide native total_increasing sensor information to Home Assistant
  # This makes it easier to add to the Energy Dashboard
  - platform: template
    id: water_consumption
    name: "${devicename} Consumption"
    unit_of_measurement: "gal"
    state_class: total_increasing
    # Return 0 decimal places as the water meter only measures in whole gallons
    accuracy_decimals: 0
    device_class: water
    icon: "mdi:gauge"

  - platform: wifi_signal
    name: "${devicename} WiFi Signal"
    update_interval: 300s

# Enables status LED
status_led:
  pin: GPIO2
After the dev board is deployed, I simply add it to Home Assistant through the ESPHome integration. Now all of the sensors are available in Home Assistant.
Irrigation Meter with OpenSprinkler
The sub-meter being used for tracking irrigation consumption is also the DAE MJ-75. Reminder; the meter produces a pulse for each gallon of water consumed. I read this data by connecting the meter to my special sprinkler controller, OpenSprinkler.
My OpenSprinkler controller supports different input sensors. One of the supported sensors is a pulse meter, which is exactly what I have. There are 3 easy steps to get it working:
- Install the pulse-output water meter
- Connect the wires from the water meter to the sensor ports on the OpenSprinkler controller
- Configure the sensor input on the OpenSprinkler dashboard
Now OpenSprinkler can track water usage. But how do I get the data in OpenSprinkler over to Home Assistant?
Simple. By using the hass-opensprinkler integration. This integration exposes entities, controls, and data over to Home Assistant.
When I first started using this integration, I don’t believe there was an entity to show water consumption via the integration I was using (I think this is still true?). Since there was no consumption entity, I had to figure out a different way to calculate my consumption.
Luckily, the other exposed entities seemed to work without issue. As a rule of thumb, irrigation flow rates are generally constant and don’t fluctuate too much. Since I have a reliable flow rate coming from the controller, I can calculate the consumption by using a Riemann sum calculation of the current rate. This is basically plotting out a graph of the flow rate over time, and calculating the sum of all area under that line (e.g. a less precise integral).
1. Converting Liters to Gallons
Input: sensor.opensprinkler_flow_rate (Flow rate from OpenSprinkler integration, but it’s in Liters)
Even if the OpenSprinker controller is set to use Imperial units, the OpenSprinkler API still exposes all values in SI. This means that I need to create a new sensor in Home Assistant to convert L/min to gal/min. That way the units match the rest of my system.
Here is my template sensor to convert the OpenSprinkler flow rate from L/min to gal/min.
- sensor:
    - name: "OpenSprinkler Flow Rate Gallons per Minute"
      unique_id: opensprinkler_flow_rate_gallons
      unit_of_measurement: 'gal/min'
      state_class: measurement
      state: "{{ float(states('sensor.opensprinkler_flow_rate') | float(0)) * 0.2641720524 }}"
Output: sensor.opensprinkler_flow_rate_gallons (Flow rate in gallons)
2. Converting Rate to Consumption
Input: sensor.opensprinkler_flow_rate_gallons (Flow rate in gallons)
Now that we have a rate in our preferred unit, we need to calculate the actual consumption. I’m using the Riemann sum helper to convert rate into consumption.
Note: I’m using a right-hand side Riemann sum for this calculation. If I use a left-hand/mid-point, and I don’t capture any water usage for a while, we would see a huge spike in consumption when the next data point is tracked because it would assume a non-zero rate occurred over the entire duration. This is corrected by using a right-hand Riemann sum.
 Consumption by Riemann sum integration
Output: sensor.sprinkler_consumption_sum_gallons (Consumption in gallons)
3. Adding Consumption to a Utility Meter
Input: sensor.sprinkler_consumption_sum_gallons (Consumption in gallons)
Next, I track the consumption with a utility meter helper.
 Utility Meter of OpenSprinkler consumption
Output: sensor.sprinkler_consumption_gallons (Utility meter sensor)
4. Fixing the Utility Meter
Input: sensor.sprinkler_consumption_gallons (Utility meter sensor)
We’re almost done. For whatever reason, the utility meter that I create above ends up missing key components that allow me to add it to my Energy Dashboard. To remedy this, I have to manually add a device_class and unit_of_measurement through the customization entry for the sensor in order for it to be allowed in the Home Assistant Energy dashboard.
I believe this problem can be avoided by defining the utility meter in
yamlinstead of the UI.
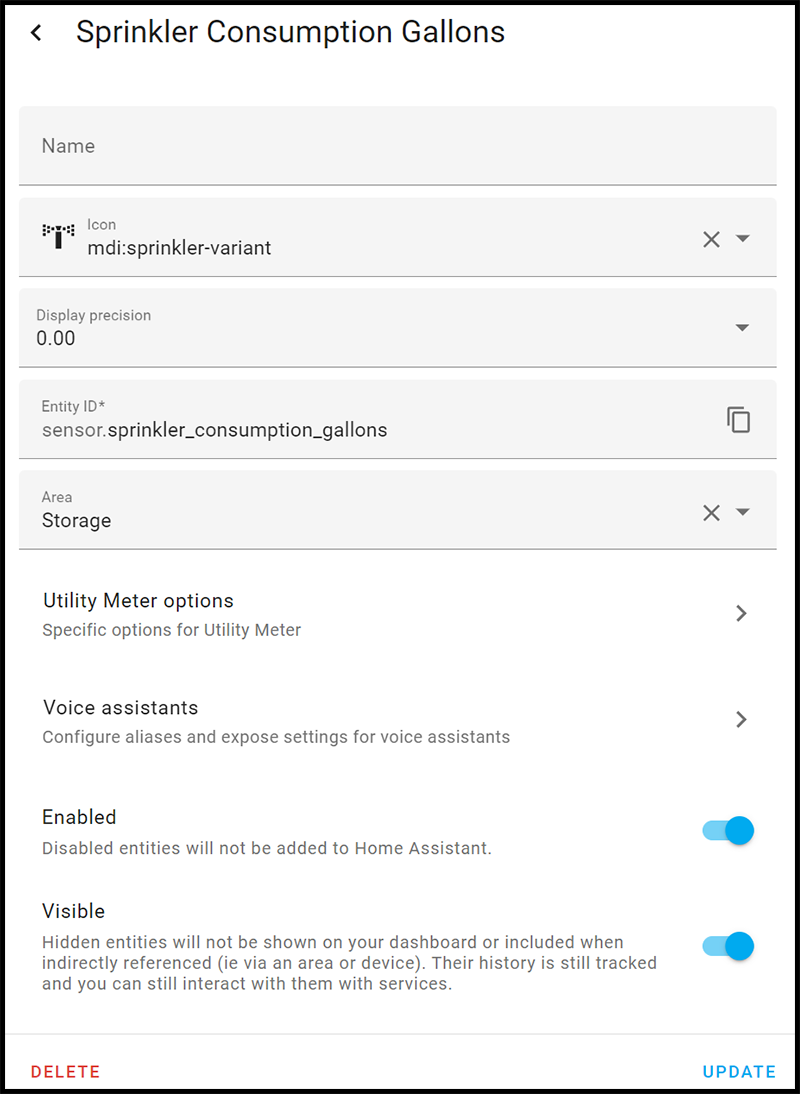
sensor.sprinkler_consumption_gallons:
  device_class: water
  unit_of_measurement: gal
Correctly capturing the irrigation water consumption was more involved than I initially thought. But now I can add irrigation consumption to my energy dashboard and track long-term data.
Companion Automation
At the time of writing, I don’t have an advanced alerting system to tell me if my usage is higher than normal. But I do have a basic one. This is the best I could come up with this past summer on my limited time.
This automation will alert my family if we’re using a higher than expected quantity of water (2000+ gallons). It’s only useful if the irrigation consumption is consistent each run. There are ways to make it dynamic, but this met my acceptance criteria to get something deployed.
alias: Alert - Notify irrigation usage high
description: "Send a notification alert if the irrigation usage is higher than expected at the end of the day"
trigger:
  - platform: time
    at: "19:00:00"
condition:
  - condition: numeric_state
    entity_id: sensor.sprinkler_consumption_gallons
    above: 2000
action:
  - service: notify.family
    data:
      message: >-
        Irrigation has used {{states('sensor.sprinkler_consumption_gallons')}}
        gallons today. That was previously considered high. Please investigate.
      title: 💧🌱 Irrigation Usage High!
      data:
        notification_icon: mdi:sprinkler-variant
        group: irrigation-alert
        channel: irrigation-alert
        data:
          ttl: "0"
          priority: high
mode: single
Additional Wishes
Water Sub-Metering Devices
Home Assistant energy monitoring allows users to track separate electric devices, like smart plugs, in addition to the main meter. I really wish Home Assistant supported sub-metering devices for water. That way I could track the irrigation long-term statistics without another templated sensor. I understand why it’s not included. I don’t think having sub-meters in series is very common.
To work around this setback, I need to create a template sensor that subtracts my irrigation sub-meter consumption from the total consumption of my household. I then add both meters back into the dashboard to give me a full picture of my consumption.
# Calculate standard home water consumption without irrigation
# Fixes issue where there are two meters in series, and we want to avoid double-counting consumption
- platform: template
  sensor:
    standard_water_consumption:
      state_class: total_increasing
      unit_of_measurement: gal
      device_class: water
      value_template: >

      friendly_name: Standard Water Consumption
 Water consumption in the Home Assistant Energy Dashboard
Auto Shutoff
I wish my solution had a built-in shutoff, but I wasn’t able to budget for it at the time of install. Luckily, this is easy to fix.
When my water sub-meters were installed, I made sure to add additional quarter-turn shutoff valves before each meter. My goal is to eventually install a water valve actuator around the shutoff. Then I can activate it if I ever detect a leak from one of my sensors or detect a usage anomaly. Something like the Zooz Titan Water Valve Actuator (ZAC36) or the EcoNet Bulldog Valve Robot (EVC200-HCSML) would work nicely.
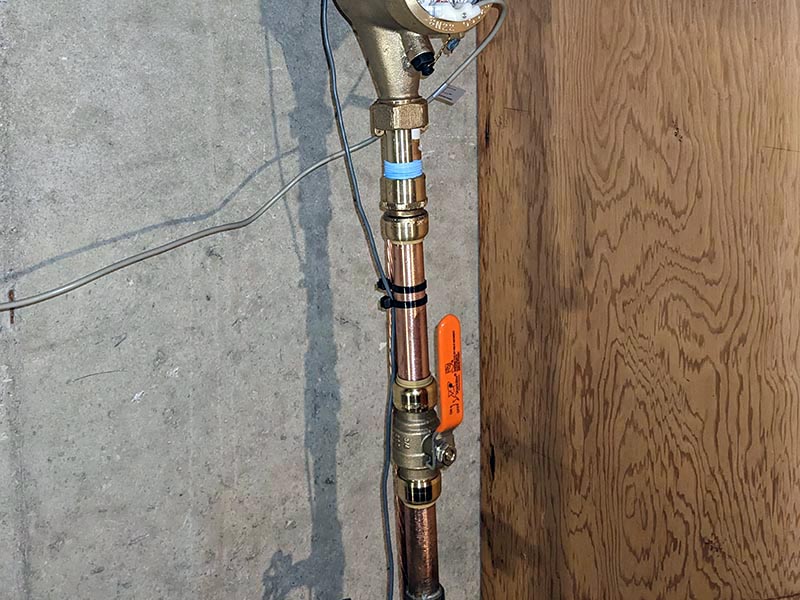 Shutoff valve installed below water sub-meter, ready for a water valve actuator
Low Flow Drawbacks
One drawback with the DAE MJ-75 water meter is that the meter doesn’t detect super slow water flows. For example, if my whole-home humidifier is running, my DAE meter usually won’t pick up any water flow since there isn’t enough volume moving. On the other hand, the water meter installed by the township (which is far more expensive) easily detects the slower water flow.
I suspect other commercial products like the Flume and Moen Flo have no trouble detecting these lower flow rates, since this is an advertised selling point.
While the township meter and my sub-meter both list a minimum flow rate of 0.25 GPM, the township water meter performs slightly better outside of the spec and still manages to track consumption when our humidifier is running. On the other hand, the DAE meter doesn’t reliably track the water consumed by the humidifier.
The drawback with these findings is that I don’t think I’ll be able to detect super small leaks as easily as a commercial product (unless I use a different meter).
Conclusion
I like tracking our water usage. While I haven’t fully matched commercial offerings, I feel that I am close. Next summer I hope to become more involved with tracking abnormal usages. My solution doesn’t require internet, there are no subscription fees, and these parts are stupid easy to replace if they ever fail. I also have a path forward to implement premium features like auto-shutoff.
It’s possible that using a more expensive sub-meter would have eliminated these low-flow concerns. But generally, everything is being tracked as it should.
I’ve reached the trifecta of tracking all utilities in my house.