Automating Attic Pest Control
Kyle Niewiada on April 13, 2025
10 Minute Read | Small project
Updated on November 30, 2025
Dealing with pests is an unwelcome reality for many homeowners. My recent encounter wasn’t just about the pests themselves but also about finding a practical solution that fit my challenging situation. This post details my journey into automated pest monitoring in a hard-to-reach location.
It started back in February 2024. For the first time, I heard the unmistakable sound of tiny claws scurrying above our ceiling. Even the cats noticed, sitting perfectly still, staring intently upwards. It was 2 AM, my newborn was asleep in my arms, and free time felt like a distant memory. The thought of regularly climbing into the attic to check traps was immediately daunting. That was the moment I started recalling something I never thought I’d want: a smart mousetrap.
Note: The solution I pick in my post isn’t available for purchase anymore. Instead, just glue a door sensor to a snap trap or live trap door. This directly addresses the “I don’t want to climb into the attic daily” problem. 🚫🪜
Considering the Options
When dealing with rodents, the primary choice is often between live traps (designed to capture the animal unharmed for release) and kill traps (designed for quick dispatch). Both approaches have proponents, and the best choice often depends on the specific situation and personal philosophy.
Live trapping appeals to many due to its potential for humane handling, avoiding the need to kill the animal. However, it comes with its own challenges, including finding suitable locations for release far enough away to prevent reentry.
Kill traps are chosen for reasons such as perceived faster resolution and avoiding the complexities of release. Within kill traps, methods vary—from traditional snap traps to glue traps (often considered inhumane due to prolonged suffering) and electric traps. For my specific situation, I needed a remotely monitored solution for an inaccessible attic space. I leaned towards an electric kill trap. The key driver was how easily I could permanently integrate it within my smart home.
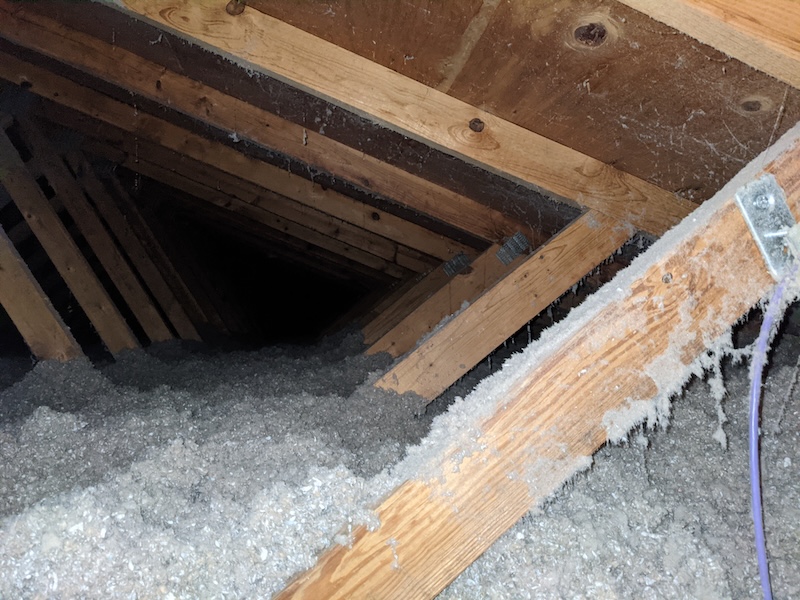 My dark, endless attic that I definitely don’t want to climb through daily.
My Specific Situation
My situation demanded a very specific type of solution. Because the trap would be in the attic, that would mean it was only accessible via a ladder in the garage. Regular checks were highly impractical. Leaving a dispatched mouse unchecked, especially during warmer months, would not be a good idea. ♨️
Many years ago, I had heard of a smart mousetrap by a company called Dome. At the time, I scoffed at the idea of an $80 mousetrap. But that knowledge had somehow lived rent-free in my head ever since. But with my time hardly available, it didn’t seem so absurd. I could purchase a pre-built solution, add it to my Z-Wave network, and be good to go.
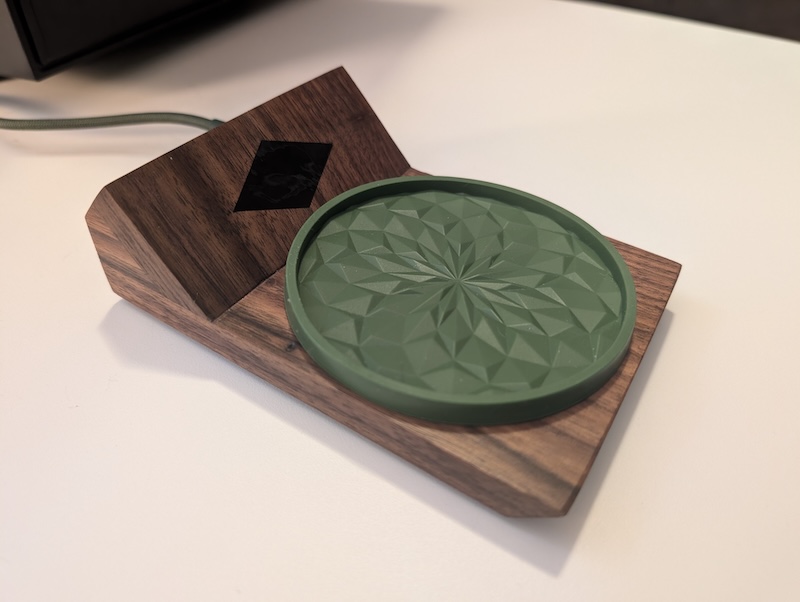
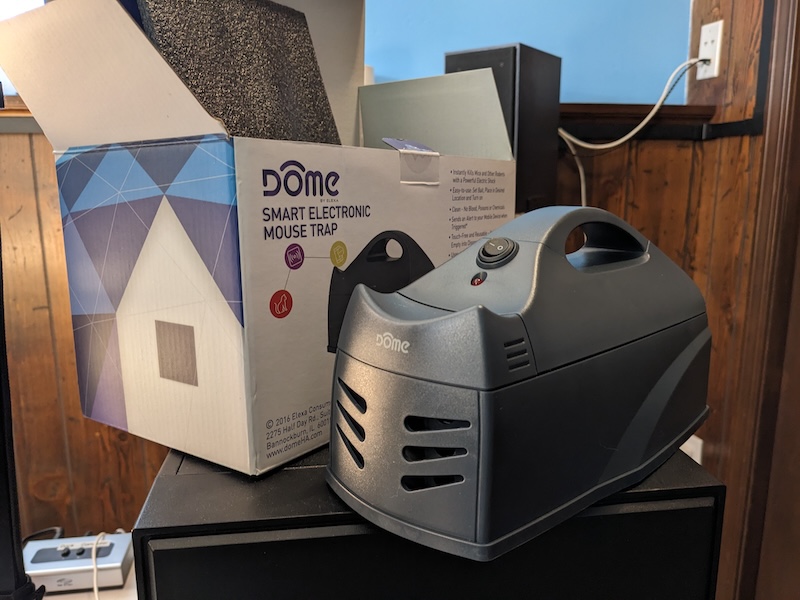
Elexa Dome Z-Wave Mousetrap (Mouser)
The Dome Smart Electronic Mouse Trap unboxed in real life.
The model I landed on was the “Elexa Dome Z-Wave Smart Electronic Mouse Trap”, previously called the “Dome Mouser”.
I would love to leave a link on where to purchase it, but I took so long to finish writing this post that it has been unavailable to purchase anywhere for over a year.
However, when I started this project, Home Depot was selling these for only $40. This was half of the original $80 MSRP. Since it looked like stock was getting cleared out forever, I uh… bought 3. 🙈💸
Sometimes a solution is too perfect for your specific scenario to pass up the opportunity on.
What made this Z-Wave trap appealing at the time compared to some Wi-Fi, Bluetooth, or DIY solutions?
- Ready to Use: It was the easiest option for sleep-deprived “dad brain” me. I could just turn it on, add it to my Z-Wave network, and then write some light Home Assistant automations for the notifications.
- Battery Life: Z-Wave’s low power usage was key for potentially years of operation without needing attic access for battery changes.
- Network Reliability: It leverages my existing robust Z-Wave mesh network. I confirmed it has connectivity through at least 7 neighboring devices, ensuring reliable signal transmission out of the attic.
- Configuration: The 2-way communication allowed for deeper integration and control. I could monitor battery levels remotely and even potentially adjust parameters like:
- Electric discharge mode (pulse/constant) and duration.
- Check-in intervals for configuration updates (it always reports status changes like activations instantly).
- Offline Check-in: I also implemented a backup automation in Home Assistant to notify me if the trap failed to check in for 48 hours, alerting me to potential connectivity or battery issues (code included further down).
It represented a neat, albeit niche, technological solution perfectly tailored to solve my specific problem: reliable, automated monitoring in an inaccessible space.
After navigating some significant shipping delays from Home Depot, they finally arrived 45 days later. I swear, these were definitely getting drop-shipped from a partner who had most certainly lost them in the back of their warehouse.
Setup
Setting it up was straightforward within my Z-Wave network. I put the device in pairing mode, connected it with Z-Wave JS UI, and allowed Home Assistant to populate the new entities in its dashboard.
I armed the device, threw in a chunk of copper wire, and watched the sparks fly. My caveman test showed that it was working and the tripped status was updating correctly in Home Assistant.
I added some fresh bait, rearmed the device, and put it in my attic.
Time to proceed with the customizations.
 Z-Wave JS UI showing the information for my attic mousetrap.
Home Assistant Configuration
I’m going to go pretty light on the exacts here because I doubt anyone else is ever going to buy the Z-Wave Dome Mouser again.. Instead, I’m going to try to keep this generic enough that anyone can apply these ideas to their own DIY mousetrap.
Here are the lists of helper sensors and automations that I use to track the status of the trap, monitor the healthchecks, and notify me when it activates.
Helper Sensors
Healthcheck
This is the template code for a binary sensor that checks if the trap has been “seen” in the last 24 hours. This is useful for ensuring that the trap is still operational and connected to the network. If the trap hasn’t been seen recently, the binary sensor will return off.
- Used for: Healthcheck Notifications
Create a new template binary sensor in the UI with the following template value. It takes our *_last_seen from above and checks if it is greater than 24 hours ago. If it has been longer than 24 hours, it returns off signifying that the trap hasn’t been seen in a while.
{{ (states('sensor.attic_mousetrap_last_seen') | as_timestamp(0) | int) > ((utcnow() - timedelta(hours=24)) | as_timestamp | int) }}
Counters
Want to know how many mice have been caught with this trap? How about how many have been missed? Want to break it down to know which trap is the most successful? Great!
First, create some helper counters.
I use the following:
counter.attic_mousetrap_catch_countcounter.attic_mousetrap_miss_count
Then create a new template sensor that does some math to calculate the success rate of the trap.
{% set catch_count = states('counter.attic_mousetrap_catch_count') | int %}
{% set miss_count = states('counter.attic_mousetrap_miss_count') | int %}
{% set total_count = catch_count + miss_count %}

{% if total_count > 0 %}
  {{ (catch_count / total_count * 100) | round(0) }}
{% else %}
  0
{% endif %}
That’s it.
Automations
Healthcheck Notifications
This automation will notify you if the trap hasn’t been seen in the last 24 hours based on the state of the “Healthcheck” template binary sensor entity created above.
[Yaml] Healthcheck Automation
alias: Healthcheck for mousetrap (Attic)
description: "Send a notification if the mousetrap hasn't been seen in 24 hours."
mode: single
triggers:
  - at: "19:00:00" # I check at 7 PM every day as this is the most likely time I will be able to actually address a failed check in.
    trigger: time
conditions:
  - condition: state
    entity_id: binary_sensor.attic_mousetrap_healthcheck
    state: "off"
    for:
      hours: 26
      minutes: 0
      seconds: 0
actions:
  - data:
      title: 🐭🪤 Attic mousetrap unresponsive
      message: The attic mousetrap hasn't been updated in a while. Please investigate.
      data:
        notification_icon: mdi:rodent
        group: mousetrap-alert
        channel: mousetrap-alert
    action: notify.family
Triggered Notifications
Here is the automation that I use to send notifications when the mousetrap is triggered. This uses the binary_sensor.attic_mousetrap_sensor_state_general_purpose entity to determine if the trap has been triggered.
It also uses the binary_sensor.attic_mousetrap_trap_armed entity to determine if the trap has been re-armed after a catch. This is useful for clearing any remaining “mouse caught” notifications on all devices since it’s no longer actionable.
It uses the counter.attic_mousetrap_catch_count entity to increment the catch count when the trap is triggered.
Finally, it adds a notification action button (ATTIC_MOUSETRAP_FALSE_ALARM) to mark the catch as a false positive. It is tied to a separate automation below that decreases the catch count and increases the miss count.
[Yaml] Notify Attic Mousetrap Triggered Automation
alias: Notify attic mousetrap triggered
description: "Send notifications when the mousetrap is triggered."
triggers:
  - entity_id:
      - binary_sensor.attic_mousetrap_sensor_state_general_purpose
    # When the mousetrap is triggered, alert the family!
    id: caught
    trigger: state
    from: "off"
    to: "on"
  - entity_id:
      - binary_sensor.attic_mousetrap_trap_armed
    # When the mousetrap is re-armed, we use this to clear any remaining notifications on all devices since it's no longer actionable.
    id: armed
    trigger: state
    from: "off"
    to: "on"
actions:
  - choose:
      - conditions:
          - condition: trigger
            id:
              - caught
        sequence:
          - parallel:
              - data:
                  title: 🐭🪤 ZAP! Attic mousetrap triggered
                  message: Oh no! The attic mousetrap has been triggered.
                  data:
                    ttl: 0
                    priority: high
                  data:
                    notification_icon: mdi:rodent
                    group: mousetrap-alert
                    channel: mousetrap-alert
                    tag: mousetrap-alert-attic
                    push:
                      interruption-level: time-sensitive
                    actions:
                        # Optional action button to mark the catch as a false positive. You should tie this to a separate automation to decrease the catch count and increase the miss count.
                      - action: ATTIC_MOUSETRAP_FALSE_ALARM
                        title: False Alarm
                action: notify.family
              - metadata: {}
                data: {}
                target:
                  entity_id: counter.attic_mousetrap_catch_count
                action: counter.increment
      - conditions:
          - condition: trigger
            id:
              - armed
        sequence:
          - data:
              message: clear_notification
              data:
                group: mousetrap-alert
                channel: mousetrap-alert
                tag: mousetrap-alert-attic
            action: notify.family
mode: single
Last, this is the automation that is triggered when the user marks the catch as a false alarm via the notification. It updates the counters accordingly.
[Yaml] Attic Mousetrap False Alarm Automation
alias: "Attic mousetrap false alarm"
description: "When the attic mousetrap is triggered, but the user marks it as a false alarm via the notification, we need to update the counters."
triggers:
  - event_type: mobile_app_notification_action
    event_data:
      action: ATTIC_MOUSETRAP_FALSE_ALARM
    trigger: event
conditions: []
actions:
  - parallel:
      - target:
          entity_id: counter.attic_mousetrap_miss_count
        data: {}
        action: counter.increment
      - target:
          entity_id: counter.attic_mousetrap_catch_count
        data: {}
        action: counter.decrement
mode: single
Tracking Effectiveness
Now that we’re all configured, how did everything end up working?
To monitor the situation, I set up a simple counter in my smart home dashboard tracking the activations for each trap (configured above). This helps me understand the extent of the issue and verify the effectiveness of the placements over time.
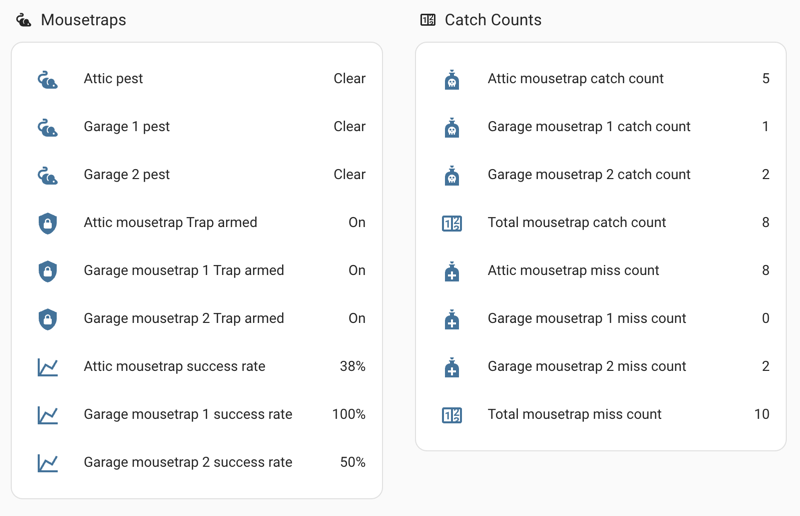 Mousetrap failure and success rates.
So it did… not that great, honestly. 📉
Initially, it appears like mice were not getting caught but still triggering the trap. Later, I theorized that some of the mice were so small that they were shot out of the trap from the shock. But they’d always return the next day.. so.. I had another shot?
My most shameful realization with this data is that I could almost always succeed by catching the mouse in a second trap opposing the opening of the first one. ☄️
But that theory has been unproven. Since I implemented the “catch trap” idea in the attic, I haven’t seen any more mice beyond the last catch. Which is a good problem! That means I might have located and sealed all remaining entry points.
If I do start getting more, that means I need to keep scouting on how they’re getting in. 🔭
What Are We Even Doing Here?
Which brings us back to the main point. What are the mousetraps even doing anymore if nothing is getting caught?
They’re a fallback.
If the mousetrap gets triggered, they are letting me know I’ve failed to locate some kind of entry point into my attic. I need to go back, identify a new possible entry point, and seal it up.
Only then will clearing out the attic actually solve anything.
Prevention First: Stop Them Before You Need Traps
While automated trapping provides a solution once pests are inside, the ideal goal is always prevention. Trapping should be a secondary measure after addressing how they got in. In my case, whenever I find a mouse, my first step is to always address any potential entry points to prevent this from happening again.
Alternative Solution: DIY Smart Trap
Just taking a quick sidestep here. You don’t need a fully featured Z-Wave smart mouse trap. Also, you can’t really find the Dome Z-Wave Mouser anywhere anymore. I went that route because I had zero free time to spend after the birth of our new child.
With just a little bit of DIY effort, you can glue any door sensor to a standard snap trap or live trap. Then you’ll know when the device has been triggered so you can attend to it.
This achieves the primary goal (remote notification) using readily available and often cheaper components. While it doesn’t offer the configuration depth of the specialized trap, it directly addresses the “I don’t want to climb into the attic daily” problem. 🚫🪜
Conclusion
While the specific Z-Wave device I used might be a relic of the near past, the underlying principle of using smart home tech to monitor and manage inconvenient tasks remains highly relevant. Whether it’s a specialized device or a DIY sensor combination, automating trap notifications for hard-to-reach areas provides peace of mind and makes dealing with pests significantly more manageable.